Hyperlapse
Definition:
A hyperlapse is a specialized type of time-lapse photography that incorporates camera movement (e.g., linear motion, rotation, or tracking) to create a dynamic, immersive video effect. Unlike a standard time-lapse (which typically uses a fixed camera), hyperlapses capture motion through a scene—for example, moving forward through a city street, orbiting a landmark, or ascending a staircase—while compressing time. The result is a smooth, cinematic sequence that blends time compression with spatial movement.
Core Working Principles
1. Time Compression + Motion
Hyperlapses combine two key elements:
- Time-lapse: Capturing still images at set intervals (e.g., 1 frame every 2–5 seconds) and playing them back at standard video speed (24/30 FPS), compressing minutes/hours into seconds/minutes.
- Controlled Camera Movement: The camera is moved incrementally (or continuously) between shots, either manually (with stabilization) or via motorized tools (e.g., sliders, gimbals, drones).
2. Stabilization & Post-Processing
To achieve smooth motion (critical for hyperlapses), two approaches are used:
- In-Camera Stabilization: Using a gimbal, slider, or motorized dolly to keep the camera steady during movement. For long-distance hyperlapses (e.g., walking through a city), a gimbal with image stabilization (IS) is essential to avoid shakiness.
- Post-Processing Stabilization: Software (e.g., Adobe Premiere Pro, After Effects, or dedicated tools like Hyperlapse Pro) aligns each frame, corrects for camera drift, and smooths motion. This step is often necessary for manual hyperlapses (e.g., handheld shots) to eliminate jitter.
3. Interval Calculation
The interval between shots determines the speed of the final hyperlapse:
- Fast movement (e.g., walking): Shorter intervals (1–2 seconds) to avoid choppy motion (more frames = smoother playback).
- Slow movement (e.g., orbiting a building): Longer intervals (3–5 seconds) to compress time more dramatically.
- Formula:
Total duration (seconds) = (Number of photos) / FPS(e.g., 300 photos at 30 FPS = 10-second video).
Key Types of Hyperlapses
1. Linear Hyperlapse
The camera moves forward/backward or left/right through a scene (e.g., walking down a hallway, driving along a road). Requires consistent speed and stabilization (gimbal or slider recommended).
2. Orbital/Circular Hyperlapse
The camera rotates around a fixed subject (e.g., a statue, building, or mountain). Often done with a motorized tripod head (e.g., Edelkrone Motion Control) for precise, smooth rotation.
3. Vertical Hyperlapse
The camera moves up/down (e.g., ascending a skyscraper elevator, climbing a mountain). Drones are commonly used for vertical hyperlapses to capture large-scale movement.
4. Freehand Hyperlapse
A manual hyperlapse shot without specialized gear (e.g., walking while holding a camera). Relies heavily on post-processing stabilization to fix shakiness—best for casual or impromptu shoots.
Equipment & Tools
1. Camera Gear
- DSLR/Mirrorless Camera: Preferred for high-resolution images (better detail in post-processing). Compact cameras or smartphones (with hyperlapse modes) work for casual use.
- Gimbal/Stabilizer: Essential for smooth motion (e.g., DJI Ronin, Zhiyun Crane) – look for models with time-lapse modes.
- Motorized Slider/Dolly: For precise linear motion (e.g., shooting a hyperlapse along a table or street).
- Tripod/Monopod: For fixed-point hyperlapses (e.g., orbiting a subject) or as a base for gimbals.
- Drone: Ideal for aerial hyperlapses (e.g., flying over a landscape or city) – most consumer drones (DJI Mavic, Phantom) have built-in hyperlapse modes.
2. Software
- Editing Tools: Adobe Premiere Pro (Warp Stabilizer), After Effects (Mocha Pro), Final Cut Pro (Stabilization feature).
- Dedicated Hyperlapse Tools: Microsoft Hyperlapse (free), LRTimelapse (for advanced alignment), Blackmagic DaVinci Resolve (color grading + stabilization).
Practical Tips for Shooting Hyperlapses
- Choose a Dynamic Scene: Look for movement (e.g., traffic, people, clouds) and a clear path (e.g., a straight road, hallway) to emphasize motion.
- Maintain Consistent Speed: Walk/drive at a steady pace – uneven speed causes choppy playback. Use a motorized tool for precision.
- Frame Carefully: Keep the subject/horizon level in every frame (use grid lines on the camera) to simplify post-processing.
- Shoot in RAW: RAW files offer more flexibility for color correction and exposure adjustments in post (critical for consistent lighting across frames).
- Lock Exposure/Focus: Avoid auto-exposure/focus (which can cause flickering) – set manual exposure and focus before shooting.
- Use a Remote Trigger: For long intervals, a remote (or camera timer) prevents camera shake from pressing the shutter button.
Common Challenges & Fixes
- Shakiness/Jitter: Fix with gimbal stabilization or post-processing (Warp Stabilizer in Premiere Pro). For severe jitter, use LRTimelapse to align frames.
- Flickering (Light Changes): Shoot in manual exposure, use a flicker-reduction plugin (e.g., Deflicker in Premiere Pro), or adjust white balance in post.
- Choppy Motion: Increase the number of frames (shorter intervals) or slow down playback speed (e.g., 24 FPS instead of 30 FPS).
- Distortion: Use a wide-angle lens cautiously (it can exaggerate motion blur) – a standard lens (50mm) is ideal for most hyperlapses.
Applications
Social Media: Short, eye-catching hyperlapses for TikTok, Instagram, or TikTok (e.g., a day in the life, city tours).
Cinematography: Hyperlapses add dynamic shots to films, documentaries, and music videos (e.g., tracking through a city at night).
Travel Content: Capturing movement through landmarks, cities, or landscapes (popular on YouTube, Instagram Reels).
Real Estate/Architecture: Showcasing a property or building by moving through rooms or around the structure.
- High-Performance Waterproof Solar Connectors
- Durable IP68 Waterproof Solar Connectors for Outdoor Use
- High-Quality Tinned Copper Material for Durability
- High-Quality Tinned Copper Material for Long Service Life
- Y Branch Parallel Solar Connector for Enhanced Power
- 10AWG Tinned Copper Solar Battery Cables
- NEMA 5-15P to Powercon Extension Cable Overview
- Dual Port USB 3.0 Adapter for Optimal Speed
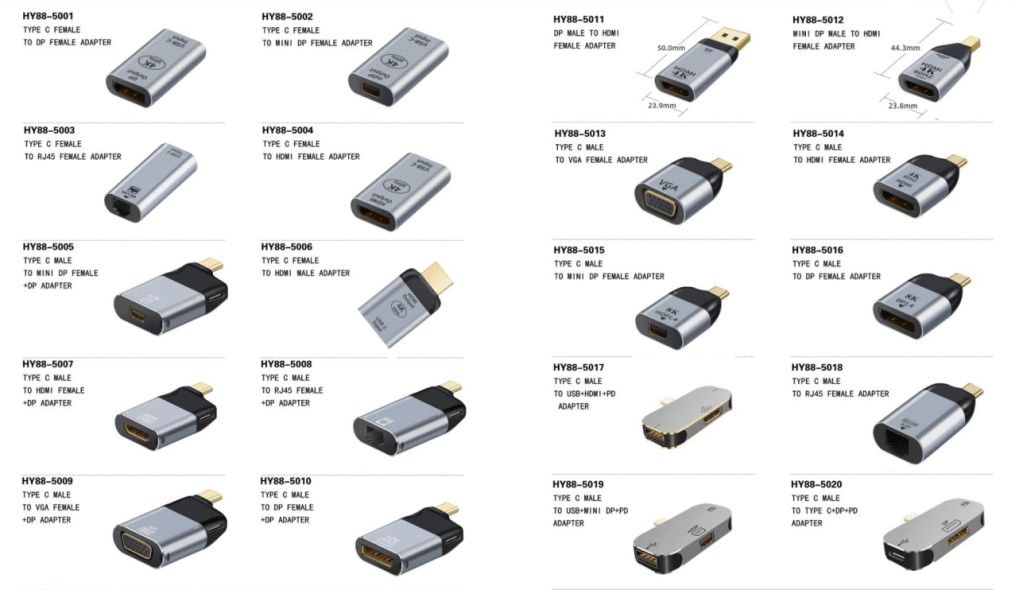
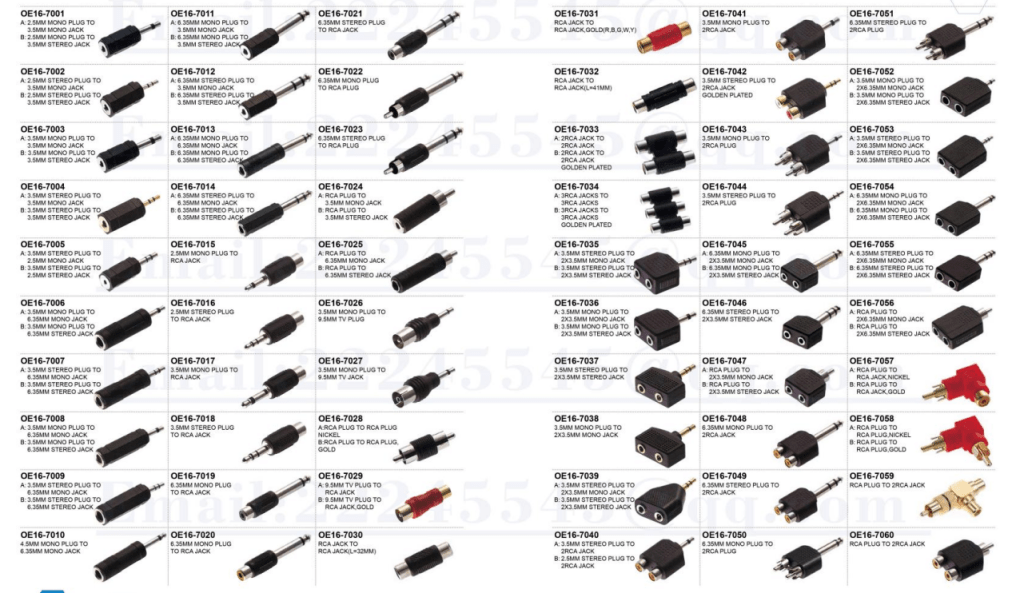
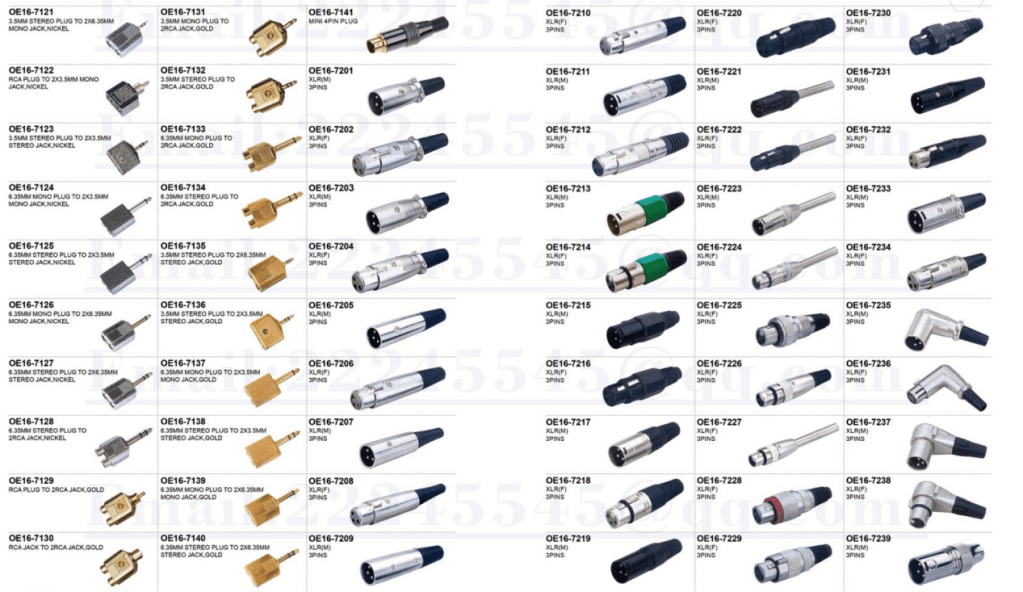
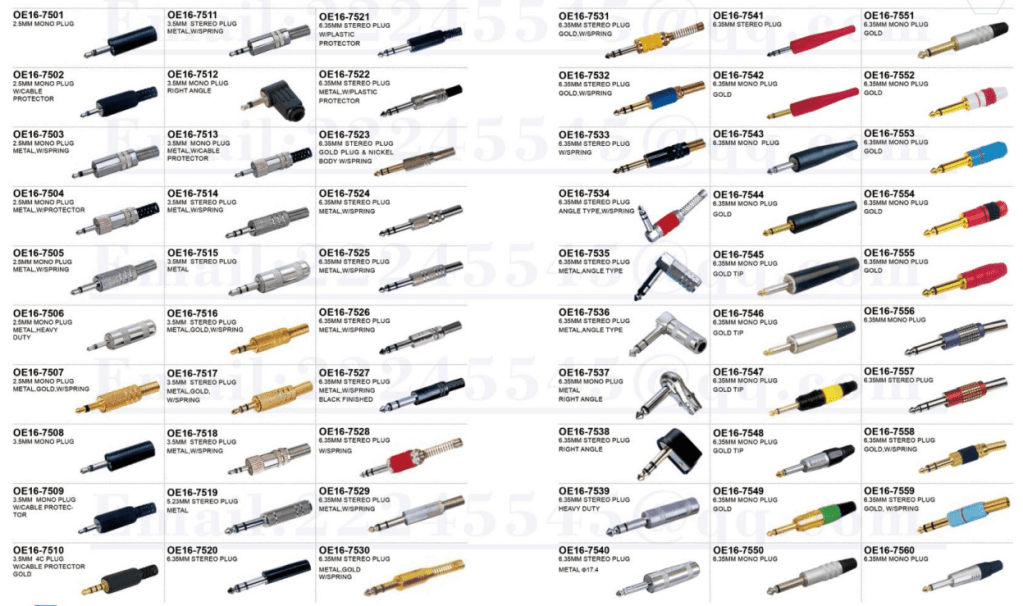
- 4-Pin XLR Connector: Reliable Audio Transmission
- 4mm Banana to 2mm Pin Connector: Your Audio Solution
- 12GB/s Mini SAS to U.2 NVMe Cable for Fast Data Transfer
- CAB-STK-E Stacking Cable: 40Gbps Performance
- High-Performance CAB-STK-E Stacking Cable Explained
- Best 10M OS2 LC to LC Fiber Patch Cable for Data Centers
- Mini SAS HD Cable: Boost Data Transfer at 12 Gbps
- Multi Rate SFP+: Enhance Your Network Speed
- Best 6.35mm to MIDI Din Cable for Clear Sound
- 15 Pin SATA Power Splitter: Solutions for Your Device Needs
- 9-Pin S-Video Cable: Enhance Your Viewing Experience
- USB 9-Pin to Standard USB 2.0 Adapter: Easy Connection
- 3 Pin to 4 Pin Fan Adapter: Optimize Your PC Cooling
- S-Video to RCA Cable: High-Definition Connections Made Easy
- 6.35mm TS Extension Cable: High-Quality Sound Solution
- BlackBerry Curve 9360: Key Features and Specs


Leave a comment